
When I’m out and about taking landscape photos one thing is painfully obvious, however careful my approach, or however fastidious my preparation, nature could not give the smallest toss about me and my troubles. In fact sometimes I think that nature actively dislikes me, that I have must have committed some terrible indiscretion at the expense of nature and it now snubs me at every given opportunity.
These of course are ridiculous thoughts, nature doesn't just dislike only me, it dislikes everyone, and that is a fact.
How else to explain the rigmarole involved with the simple task of shooting a straightforward landscape shot. One minute the sky is too bright but the ground is just right, next the sky is fine but then the ground is too dark, now they sort of both work together but in a bland, not very well exposed kind of way, but wait a second what about the extra dark bit under that tree/rock/bridge etc, or that highlight that seems to be about two thousand stops brighter than the rest of the scene?
It’s enough to make even the most dedicated photographer heap their kit into a big pile, set it on fire and jump around it in a contorted frenzy, while screaming rabid abuse at the blazing remains.
I know what you’re saying of course, just use a tripod and a neutral graduated filter to balance the exposure between land and sky, as that’s just the sort of thing you would say. And you would indeed be right to say that, but what if you didn't have a tripod or filter with you, what if, for example, you had wandered up the road with your camera to have a look at an autumnal scene, decided it was worth a shot but your kit was back in the car, and you couldn't be bothered to return and get it, what would you do then?
As I’m sure that this is a situation we've all been faced with, unless of course you are someone who routinely takes all their kit with them, all the time, which perhaps hints at deeper personal issues than simple laziness, I though it might be worthwhile to look at combining exposures after the fact to see if we can best nature at its own game.
The standard view regarding image making is to get it as spot on as you can in the camera, and I would wholeheartedly agree with that, but there are times when this isn't possible, as noted previously, so the next best thing to do is engage the bracketing function of your camera, set to continuous shooting (remember we are hand holding this bad boy) and fire off three shots that cover the exposure range of the scene. After that you can pop the lens cover back on and go home, as the next stage is done in front of a computer screen, with a cup of coffee, or a bottle of vodka if you prefer.
Either is fine, as this piece of post processing is, while I wouldn't call it slapdash, it’s certainly fairly free in so much as the effects are ‘painted’ in, so there is a certain amount of feeling and expressiveness to it rather than any technical detailed work. So you are welcome to carry it out completely wrecked if you so choose.
To get the above image I first opened all three pictures in Photoshop via Bridge using the Photomerge command, you can of course use this command directly in PS, or in Elements or launch from Lightroom, depending on your set up. How you do it is not important, but do it you must.
The most important thing to remember here is to un-tick the ‘Blend Images Together’ check box. Photoshop does a stand up job of merging photos seamlessly together, but its blending capabilities are less than stellar, when combining photos, it does tend to pick the blandest route possible. Which is fine as it shouldn't be used anyway, what’s the point of sticking your photos in Photoshop and then letting the programme tinker around with them, there is no fun in that.
So here are the three images as they are loaded in layer order, darkest at the bottom, then middle, the camera's 'correct' exposure, and on top, the lightest.
 |
| Layer three the lightest exposure |
 |
| Layer two the camera's 'correct' exposure |
 |
| Layer one, you guessed it, the darkest exposure |
 |
| Here is layer two again, the middle exposure, as you can see the trees are exposed OK but the detail in the sky has disappeared because the camera doesn't have the dynamic range to capture such differences in brightness. |
 |
| And here is layer two with the mask applied, the sky and some shadow detail has been brought in from the darker, underlying layer. |
 |
| This is the mask attached to the middle layer, anything black shows the underlying layer and anything white hides it, so the black part here means the darker sky is showing and the grey parts beneath are where some of the darker shadow areas have been revealed in the trees. The smaller brush marks at the top of the white area are where I had to mask out the tops of the trees, as they were looking too dark and quite unnatural. |
Now switch the lightest layer back on and apply an inverted mask to it, simply hold down the Alt button when clicking on the mask icon, I won’t need so much of this exposure so it makes sense to paint back in what I need, rather than painting out what I don’t. To that end I’m just using a low opacity, soft edged brush to gently coax in some decent highlights on the trees and ground. Again just adding to the depth of the picture, trying to give it some character, and not being concerned too much with detail, just getting a feel how the image is evolving.
 |
| This is the image with the lightest layer and mask applied. There is not a huge difference, this was the layer I needed the least from as it was quite overexposed, but it did allow me bring in some nice lighter tones to the leaves and ground. |
 |
| Here is the layer mask from the brightest layer, you can see I didn't need to use a much of it, which is why it's predominantly black with no pure white, which would indicate that the corresponding parts of the layer were showing through 100%.
As the images came into Photoshop as RAW files straight from the camera they are naturally quite flat, so once they have been combined in a satisfactory way I can give them a bit of a boost by applying a levels or curves adjustment layer to each one. This can of course be done to each layer before they have masks applied, but I find it works better once I have taken the elements I need from each exposure.
|
This can be done by clicking on the 3 little Russian dolls type icon on the bottom right of the layers pallet before creating the adjustment layer. Or by creating the adjustment layer then Alt clicking on the dividing line between the image layer and the adjustment layer. The adjustment layer will then have a little arrow pointing down to the image layer below, indicating that they are best of friends and it has eyes for no other layers. I've inadvertently made it sound much more complicated, and decidedly stranger, than it is of course.
 |
| When you hover the cursor over the dividing line between two layers it turns into a black and white ball/pancake hybrid type thing, one click and the upper layer shows its arrow indicating it's undying commitment to the layer below. Or until you click on it again. |
 |
| Simply clicking on this icon makes all your adjustment layers start to clip to the layer below them. And they will not stop until you turn it off. |
 |
| This is the first layer, the darkest one with Levels adjustment layer applied, this probably had the most visual impact on the image as it really darkens those shadow areas and brings out some nice detail in the sky. |
 |
| This is layer two with the adjustment applied, as you can see the trees have begun to light up and the warm tones are starting to shine |
 |
| And here is layer three, the lightest layer, what there is of it, as I didn't use much, but again, the adjustment has helped increase the luminescence of the trees and ground |
Once the contrast and colours have been given a kick it really starts to take on that painterly look, at this point I might go back to the layer masks and use a low opacity brush to paint out anything that is too strong, or bring in extra shade or highlight where I want the image to have more depth.
To finish off the image I’m going to add a vignetting effect to darken the edges and help make the trees, the focal subject of the picture, pop out a bit. So I create four new transparent layers, one for each edge, then apply a black gradient inwards from the edge on each one. Change the blending mode on each to Soft Light, then play with the transform function and opacity to scale and blend each one to a level that works.
To finish off the image I’m going to add a vignetting effect to darken the edges and help make the trees, the focal subject of the picture, pop out a bit. So I create four new transparent layers, one for each edge, then apply a black gradient inwards from the edge on each one. Change the blending mode on each to Soft Light, then play with the transform function and opacity to scale and blend each one to a level that works.
I could have used the Lens Correction filter in Photoshop but it doesn't give the same level of control, which is what I desire above all else when I'm editing my images. I'm not ashamed to say that when it comes to my photos I'm not so much a control freak, more a monstrous psychotic. Besides the Lens Correction filter doesn't give the same results.
 |
| This is the overall image with some vignetting applied. It's not to everyone's taste but I think it helps the trees stand out |
 |
| And here is the vignetting itself, so you can see how dark it it without the image behind. Some images work with it strongly applied, some faintly and some not at all. It just depends on the image and what look you are going for. |
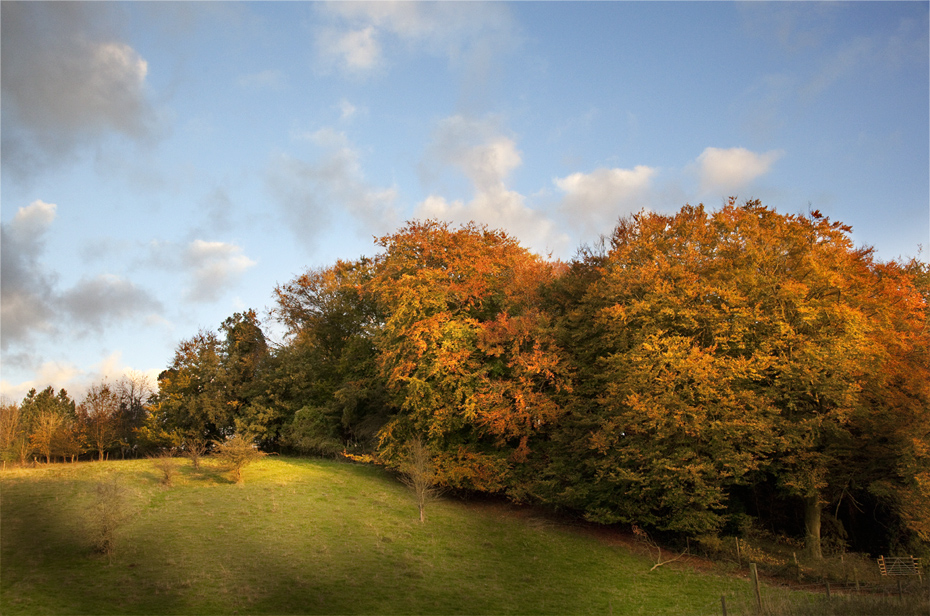
Lastly, and this is a personal choice, even though the blue of the sky and the orange of the trees compliment each other, I would prefer the blue to be more subdued, as I think it fits with the image better. So to that end I have added a photo filter adjustment layer, using the Warming Filter (81) at around 50% opacity, to give the whole image an orangey hue, which just seems to work very nicely.
|
| The final image |
No comments:
Post a Comment